Mountain West Jetting
Mountain West logoMountain West Hydro Jetting & Sewer Maintenance LLC

SEWER LINE REPAIR NEAR ME: WHAT TO EXPECT FROM START TO FINISH

Blog Article

Story by Mountain West Hydro JettingPublished June 18, 2026Sewer Line RepairServing Northern Utah and the Salt Lake corridor

Sewer Line Repair Near Me: What to Expect From Start to Finish

Searching for sewer line repair near me usually means someone has already told you the line needs work — a technician who found damage during a cleaning visit, a home inspector during a sale, or your own experience with backups that cleaning no longer fixes. The problem is that "your line needs repair" does not tell you what happens next. This article walks you through the full process, stage by stage, so you can evaluate recommendations, compare contractors, and know what to expect at every step.

Start Here

A sewer line repair is one of the larger expenses a homeowner faces — and one of the least understood. Most homeowners have never been through the process and do not know what is normal, what is optional, and what is a red flag.

What This Article Helps You Do

  • Know what happens at each of the seven stages of a sewer line repair project
  • Understand what the camera inspection should show you before you approve anything
  • Collect and compare quotes with enough context to evaluate what each contractor is proposing
  • Know what to expect on repair day — timeline, disruption, and what the crew does
  • Understand post-repair verification, restoration, and warranty

Quick Takeaway

A sewer line repair project has seven stages: initial assessment, camera inspection, repair recommendation, quote collection, contractor selection, repair day, and post-repair verification. The camera inspection is the most important stage — it determines what is wrong, where, and how bad. No repair should be approved without camera evidence you can see yourself. The entire process from inspection to completed repair typically takes one to three weeks, with the repair itself taking one to three days depending on method and scope.

Sewer Line Repair

A sewer line repair is one of the larger expenses a homeowner faces — and one of the least understood. Most homeowners have never been through the process and do not know what is normal, what is optional, and what is a red flag.

The good news: the process is logical and each stage builds on the last. If you understand what is supposed to happen at each stage, you can ask the right questions, avoid unnecessary work, and make the repair decision with real information instead of pressure.

Here is what the full process looks like, from the moment someone says "your line needs repair" to the moment the job is done and verified.

What It Means In Practice

Stage 1: Initial Assessment — How You Got Here Most homeowners arrive at "sewer line repair near me" through one of four paths:

Start with the normal pattern: wastewater should move away from the fixture, through the branch line, into the larger building drain or sewer lateral, and out toward the public or private collection system. Most confusion starts when one symptom is judged without locating where that pattern is breaking down.

For sewer line repair and replacement questions, the useful first step is separating a local fixture issue from a deeper line condition, because those two situations can look similar at the surface but lead to different next steps.

  1. Path A: A cleaning visit found something. A technician came to clear a backup or clean the main line. During the camera inspection, they found structural damage — a collapse, a severe offset, a belly, cracking, or advanced root intrusion through failed joints. The cleaning restored flow, but the technician told you the pipe has a problem that cleaning cannot fix long-term.
  2. Path B: Repeated backups despite maintenance. You have had the line cleaned two, three, four times. Each cleaning holds for a shorter period. The line keeps failing because the pipe itself is creating the blockage — not just buildup.
  3. Path C: A home inspection flagged it. You are buying or selling a home. The home inspector or a sewer scope inspection found damage in the main line and flagged it as a condition of the sale or as a negotiation point.
  4. Path D: Visible exterior symptoms. Sewage smell in the yard, wet spots or sinkholes above the sewer line path, or unusually green strips of grass that follow the line route. These suggest a break or leak in the lateral.
  5. Whichever path brought you here, the next step is the same: a camera inspection that documents what is wrong, where, and how bad.
  6. Stage 2: Camera Inspection — The Decision Foundation No repair should be approved without a camera inspection that you can watch and review. This is non-negotiable. If a contractor recommends repair without showing you what is inside the pipe, get a second opinion from someone who will.
  7. What the camera shows: i Damage type — collapse, crack, offset, root intrusion, belly, deformation, or deterioration. ii Damage location — distance from the cleanout, measured in feet. iii Damage extent — isolated to one spot, spread across several joints, or affecting the full run. iv Pipe material — PVC, cast iron, clay, ABS, or Orangeburg. v Pipe condition overall — whether the rest of the line is sound or showing early signs of the same failure.
  8. What you should ask after watching the footage: i What specifically is wrong with the pipe? Name the defect — not just "it is damaged." ii Where is the damage? Distance from cleanout and approximate location on the property. iii How much of the line is affected — one spot, multiple spots, or the full run? iv Is the rest of the line in good condition, or is it likely to develop the same problem? v Based on what the camera shows, what repair method fits and why?
  9. Mountain West's sewer camera scopes up to 200 feet of pipe with live video review. You watch the footage with the technician on screen.
  10. Important: If you arrived through Path A a cleaning visit found damage, the cleaning technician's camera footage is your starting evidence. You should not need to pay for a second inspection unless you want an independent evaluation. Ask for the footage or a written summary of the findings from the first visit.
  11. Stage 3: Repair Recommendation — What You Should Hear After the camera inspection, the contractor should give you a clear recommendation that includes:
  12. The defect. "The line has a collapsed section at 47 feet from the cleanout" or "there are root intrusion points at three joints between 30 and 55 feet, with a minor offset at 42 feet."
  13. The recommended method. CIPP lining, pipe bursting, spot excavation, or full excavation — and why that method fits the defect. For a detailed comparison of repair methods, see Trenchless Sewer Repair vs. Sewer Excavation: Which Method Fits Your Line?
  14. The scope. How much of the line is being repaired or replaced — the damaged section only, the full lateral, or a hybrid spot excavation at the worst point with lining on the rest.
  15. The access path. Where the crew will need to dig if excavation, where access pits will go if pipe bursting, or where the liner will enter and exit if CIPP. Whether the work is entirely on your property or extends into the public right-of-way.

How To Tell When It Fits

The timeline. How many days the repair will take and when it can be scheduled.

The goal is to move from guesswork to evidence. Good decisions usually come from the same sequence: define the symptom, locate the likely part of the system, check whether the issue is repeating, and decide whether cleaning, inspection, jetting, or repair planning fits.

That sequence keeps the article useful before any service conversation happens. It helps readers ask better questions and makes it harder for a vague diagnosis to sound more certain than it really is.

  1. What to question: A recommendation that jumps straight to "full replacement" without explaining why a localized repair would not work. A recommendation for trenchless on a fully collapsed line trenchless requires an intact path. A recommendation that does not include camera evidence.
  2. Stage 4: Collecting Quotes — What to Compare Get at least two quotes for any repair that involves excavation or trenchless work. Here is how to compare them.
  3. Scope match. Are both contractors proposing the same repair scope? If one quotes a spot repair and the other quotes a full lateral replacement, they are not quoting the same job. Make sure you understand why the scopes differ — one may be seeing something the other is not, or one may be recommending more work than necessary.
  4. Method match. Are both proposing the same method? A CIPP lining quote and an excavation quote are not comparable on price alone — they are different approaches with different tradeoffs. Compare method only after confirming both are appropriate for the defect see Stage 3.
  5. Included items. Each quote should clearly state: i The repair method and scope what is being fixed and how. ii Access and excavation details where they dig, how deep, how wide. iii Restoration — what surface restoration is included sod, concrete, asphalt, pavers, landscaping. iv Permit responsibility — who pulls the permit and who pays the fee. v Post-repair camera inspection — confirming the repair was completed correctly. vi Warranty — what is covered, for how long, and what voids it. vii Timeline — start date, estimated completion, and what happens if weather or complications extend the job.
  6. Watch for exclusions. Some quotes exclude surface restoration, permit fees, utility locates, or post-repair camera inspection. If these are excluded, they are costs you will pay on top of the quoted price.
  7. Licensing. In Utah, sewer line repair falls under the S410 specialty contractor license — covering sewer, sewer lines, sewage disposal, and drainage systems. Verify the contractor holds the appropriate license through the Utah DOPL license lookup.
  8. Camera evidence. Did they show you what is wrong, or did they tell you? A contractor who inspects the line and shares the footage with you is more trustworthy than one who describes the problem verbally and quotes a repair without visual evidence.
  9. Method rationale. Can they explain why the method they are proposing fits the defect? A good contractor ties the recommendation to what the camera showed — not to what they prefer to install.
  10. Scope clarity. Is the quote specific? "Replace 35 feet of sewer lateral from the cleanout to the city connection via excavation, backfill and compact, replace 12 feet of concrete sidewalk" is a clear scope. "Sewer line repair — labor and materials" is not.
  11. Restoration commitment. What does the property look like when they leave? Is sod replacement, concrete matching, or asphalt patching included? Is there a warranty on the restoration?
  12. Communication. Did they answer your questions directly? Did they explain what the camera showed in plain language? Were they willing to discuss alternatives? A contractor who pressures you to decide on the spot is a contractor you should be cautious about.
  13. Stage 6: Repair Day — What to Expect Before the crew arrives. The contractor should confirm the start date, estimated duration, and any preparation you need to do — moving vehicles off the driveway, clearing items near the dig path, or restricting water use during the repair. If the repair involves work in the public right-of-way, the permit should already be pulled.
  14. Utility locates. Before any excavation, a utility locate is required. In Utah, this is done through Blue Stakes of Utah 811 — the contractor calls at least 48 hours before digging, and utility companies mark the locations of buried gas, water, electric, and telecom lines. The contractor is responsible for calling the locate. If they have not mentioned it, ask.
  15. What happens during excavation: i The crew marks the dig area based on the camera inspection findings. ii Excavation begins — trench width and depth depend on pipe depth typically 3 to 5 feet in Northern Utah residential properties and soil conditions. iii The damaged section is exposed, removed, and replaced with new pipe PVC for most residential laterals. iv Connections are made at each end of the new section — to the existing pipe on the house side and to the city connection or existing pipe on the street side. v The trench is backfilled in layers and compacted to prevent future settlement. vi Surface restoration begins — sod, concrete, asphalt, or landscaping depending on what was above the dig.

What Makes It Easier To Use

What happens during trenchless repair CIPP lining: i The crew accesses the line through the cleanout or a small access point. ii The line is cleaned usually jetted to remove all debris and prepare the pipe surface. iii A resin-saturated liner is inserted into the pipe and inflated against the walls. iv The liner is cured with heat, UV light, or ambient temperature — creating a new pipe inside the old one. v The cured liner is cut at service connections to restore flow to branch lines. vi Most CIPP jobs complete in one day.

Small details often change the interpretation. Which fixture backed up first, whether more than one drain is affected, whether the problem returned after clearing, and whether there is odor or standing water all matter.

Use these notes to describe the issue clearly. A good description is often the difference between booking a narrow cleaning visit and starting with inspection or a broader sewer conversation.

  1. What happens during pipe bursting: i Two small access pits are dug — one at each end of the section being replaced. ii A bursting head is pulled through the existing pipe, fracturing it outward. iii New HDPE pipe is pulled into place behind the bursting head. iv Connections are made at each end. v Access pits are backfilled and the surface is restored.
  2. Your drains during the repair. You will not be able to use your drains during active repair work. The contractor should tell you when to stop using water and when normal use can resume. Most residential repairs restore drain use by the end of the same day trenchless or within one to two days excavation.
  3. Stage 7: Post-Repair Verification — What Proves the Job Is Done A repair is not complete until it is verified. Here is what should happen after the work.
  4. Post-repair camera inspection. The contractor runs a camera through the repaired section to confirm: i The new pipe or liner is properly installed with no gaps, wrinkles, or misalignment. ii Connections are sealed and flowing properly. iii The grade is correct — water flows smoothly to the exit with no pooling. iv There are no obstructions left from the repair process.
  5. You should be able to watch this footage the same way you watched the pre-repair inspection.
  6. Flow test. The contractor or you run water through multiple fixtures to confirm the full system drains normally with no backup, slow drainage, or cross-fixture reactions.
  7. Surface restoration check. Walk the repair area with the contractor. Confirm that backfill is compacted not loose or sinking, surface restoration matches what was quoted sod is laid, concrete is poured, asphalt is patched, and the area is clean.
  8. Documentation you should receive: i A written description of the work performed — what was repaired, where, and how. ii Pre-repair and post-repair camera footage or still images. iii A warranty document specifying coverage period, what is covered, and what voids the warranty. iv Permit documentation if applicable. v Contact information for warranty service.
  9. Typical Timelines Camera inspection to repair recommendation: Same day if the inspecting company also does repair to one week if you are getting independent quotes.
  10. Quote collection: One to two weeks if you are getting two or three quotes and allowing time for each contractor to inspect.
  11. Scheduling the repair: One to three weeks from approval, depending on contractor availability, permit processing, and weather.
  12. Repair duration:
  13. CIPP lining: 1 day for most residential jobs. Pipe bursting: 1 day for most residential jobs. Excavation spot repair: 1 to 2 days. Excavation full lateral replacement: 2 to 3 days, sometimes longer if the line extends under a sidewalk, driveway, or right-of-way. Surface restoration: Concrete typically needs 24 to 48 hours to cure before use. Sod needs watering and 2 to 4 weeks to establish. Asphalt can often be driven on within 24 hours.
  14. Total from "you need repair" to completed, verified job: Three to six weeks for a typical residential lateral repair in Northern Utah, accounting for inspection, quotes, scheduling, and the work itself.

How We Apply It

When you call Mountain West at 801-317-8104 or email [email protected] because you suspect or have been told your sewer line needs repair, here is where we fit in the process.

This is where the article connects back to real service work. The point is not to turn every concern into the biggest possible job; it is to match the symptom pattern to the least confusing next step that can actually answer the question.

Tying the topic back to sewer line repair and replacement keeps the advice grounded. The work should explain what was found, what is still uncertain, and why the recommended next step fits the evidence.

  1. Camera inspection. We run a sewer camera rated to scope up to 200 feet of pipe with live video review. You watch the footage with us. We identify the damage type, location, extent, and pipe condition. That inspection is the foundation for every decision that follows.
  2. Pre-repair cleaning. If the line needs to be cleared before an accurate camera inspection can be performed heavy blockage obscuring the view, we clear it first. Our hydro jetting unit operates at 3,850 PSI and 8 GPM with 300 feet of hose — lines 2 to 12 inches. Our cable machine has 100+ feet of reach. After clearing, the camera shows the pipe condition without obstruction.
  3. Plain-language findings. We tell you what we found, where it is, how much of the line is affected, and what it means. We show you the footage and explain it in terms that make the repair decision clear.
  4. Repair path guidance. Based on what the camera shows, we tell you whether the line is a candidate for trenchless repair, whether it needs excavation, or whether a spot repair would handle the damage. We explain why and what the tradeoffs are. We do not perform excavation or trenchless installation — but we identify the problem precisely so you go into the repair contractor conversation knowing exactly what the line needs and why.
  5. Post-repair inspection. After repair work is completed by a contractor, we can run a post-repair camera inspection to verify the work independently. You get an objective confirmation that the new pipe or liner is properly installed before you sign off on the job.
  6. Pricing. Inspection and cleaning visits are quoted based on line length, access, and severity. Emergency and after-hours calls carry a 15 to 35 percent premium 25 percent standard. Call for a quote.

Common Questions

These follow-up questions turn the explanation into a practical decision tool. Definitions help, but the real value is knowing when the topic matters at a property.

For sewer line repair and replacement topics, the best next questions connect the concept to symptoms, access, inspection, and the next service decision.

How do I know if I actually need repair or if cleaning is enough?

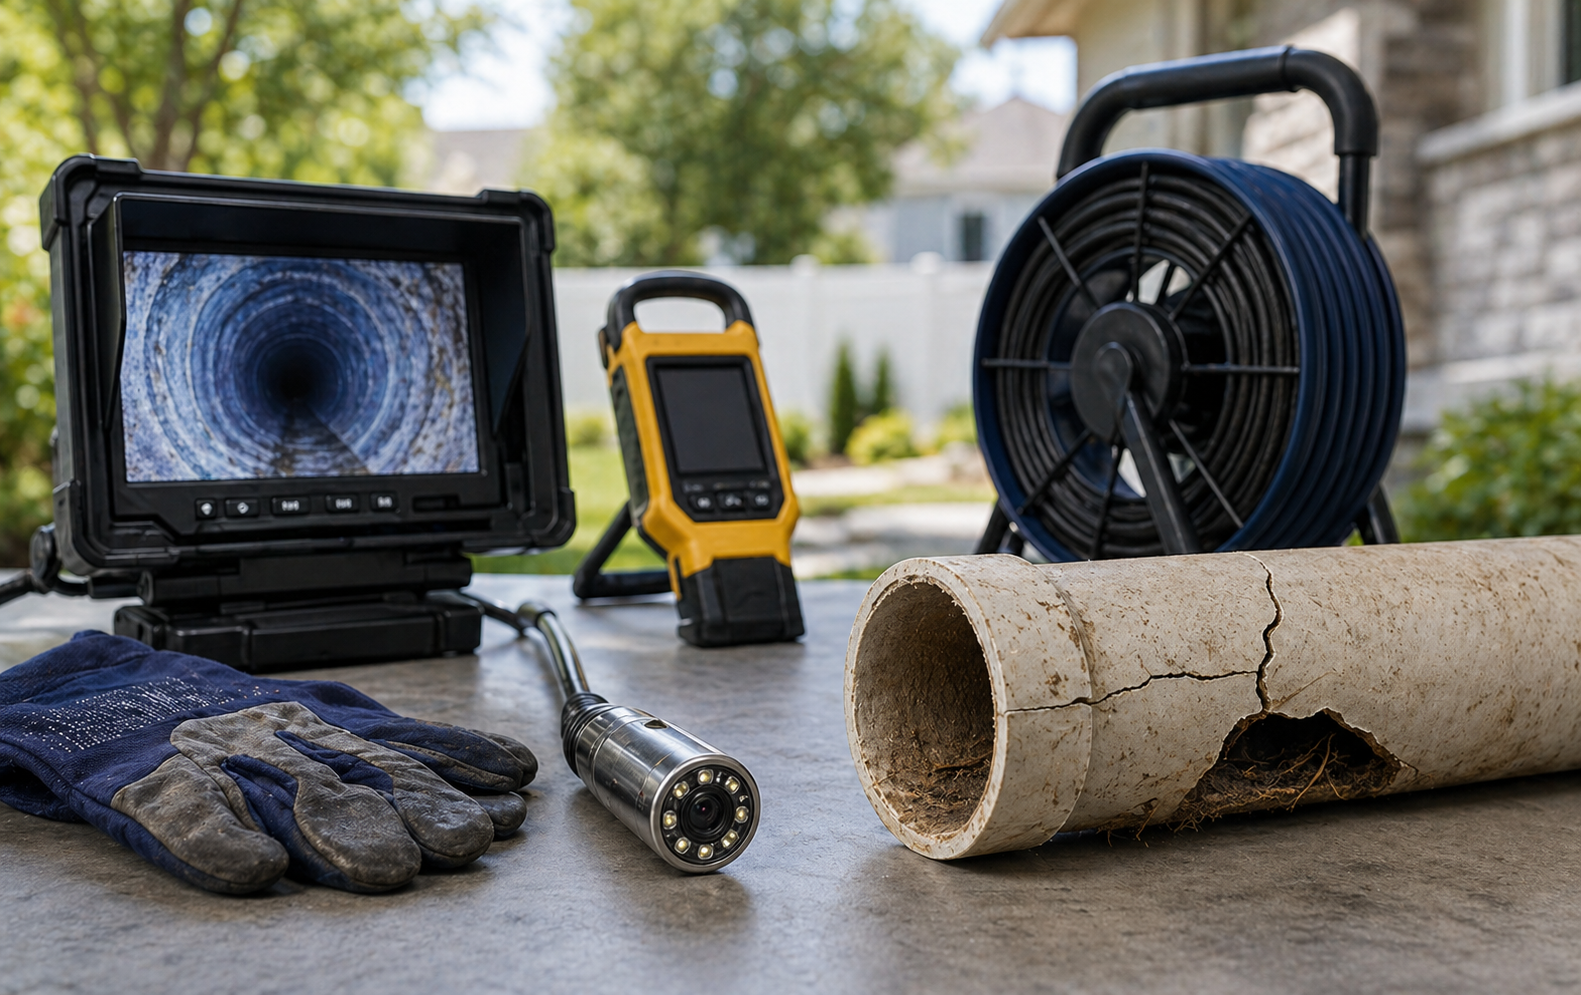
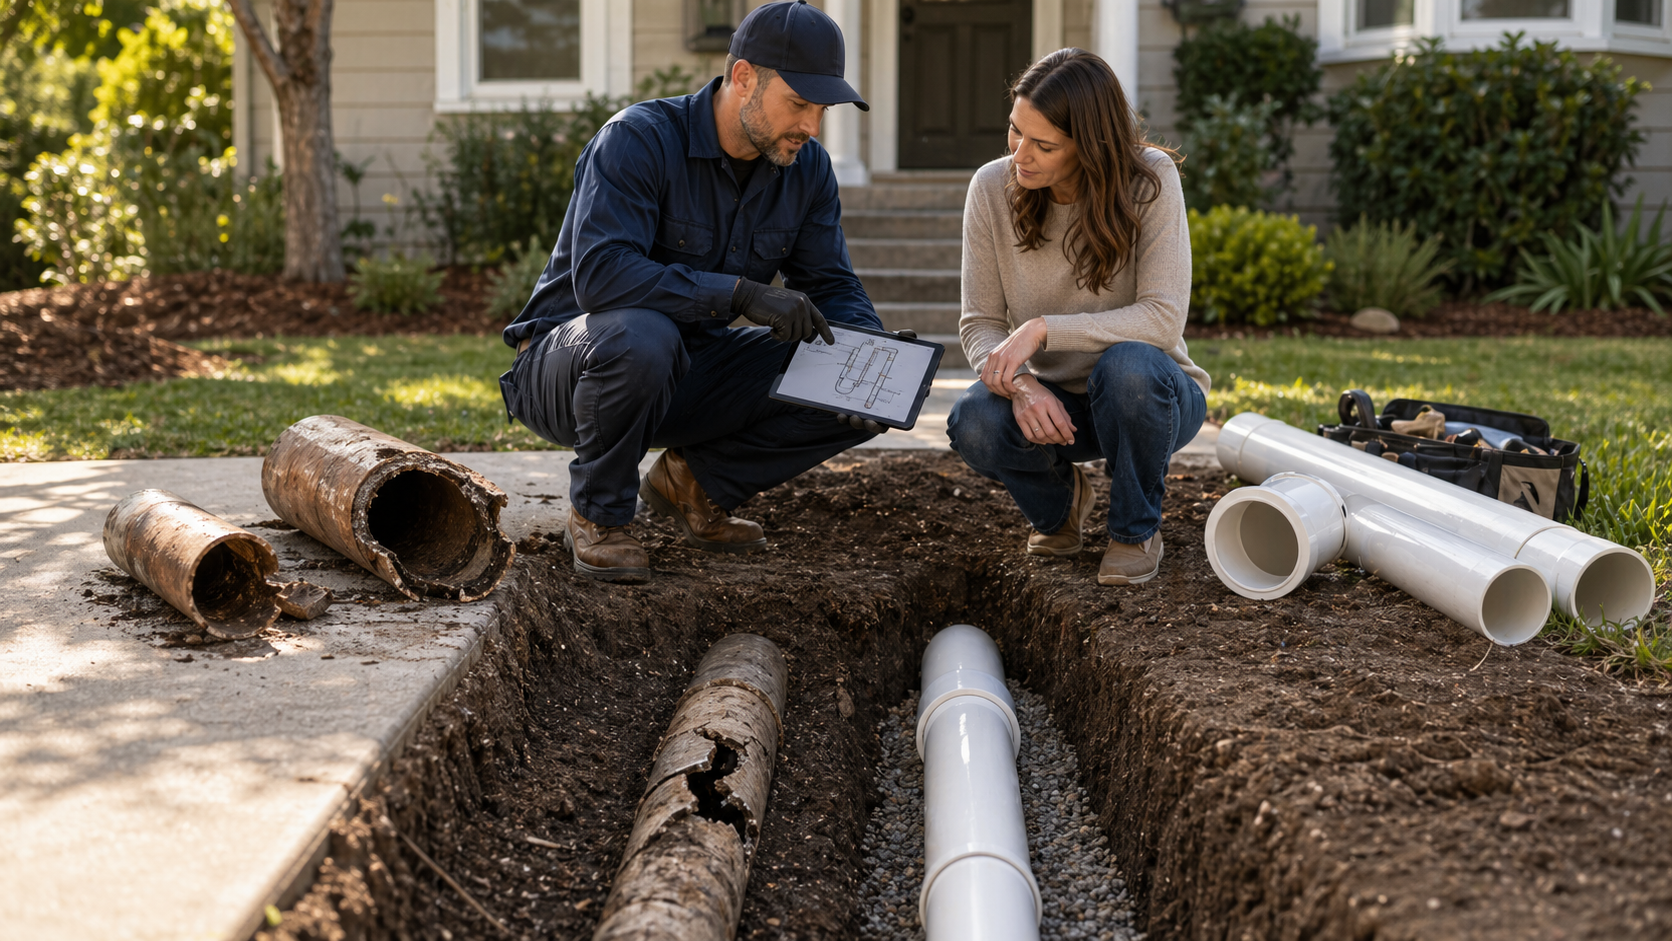
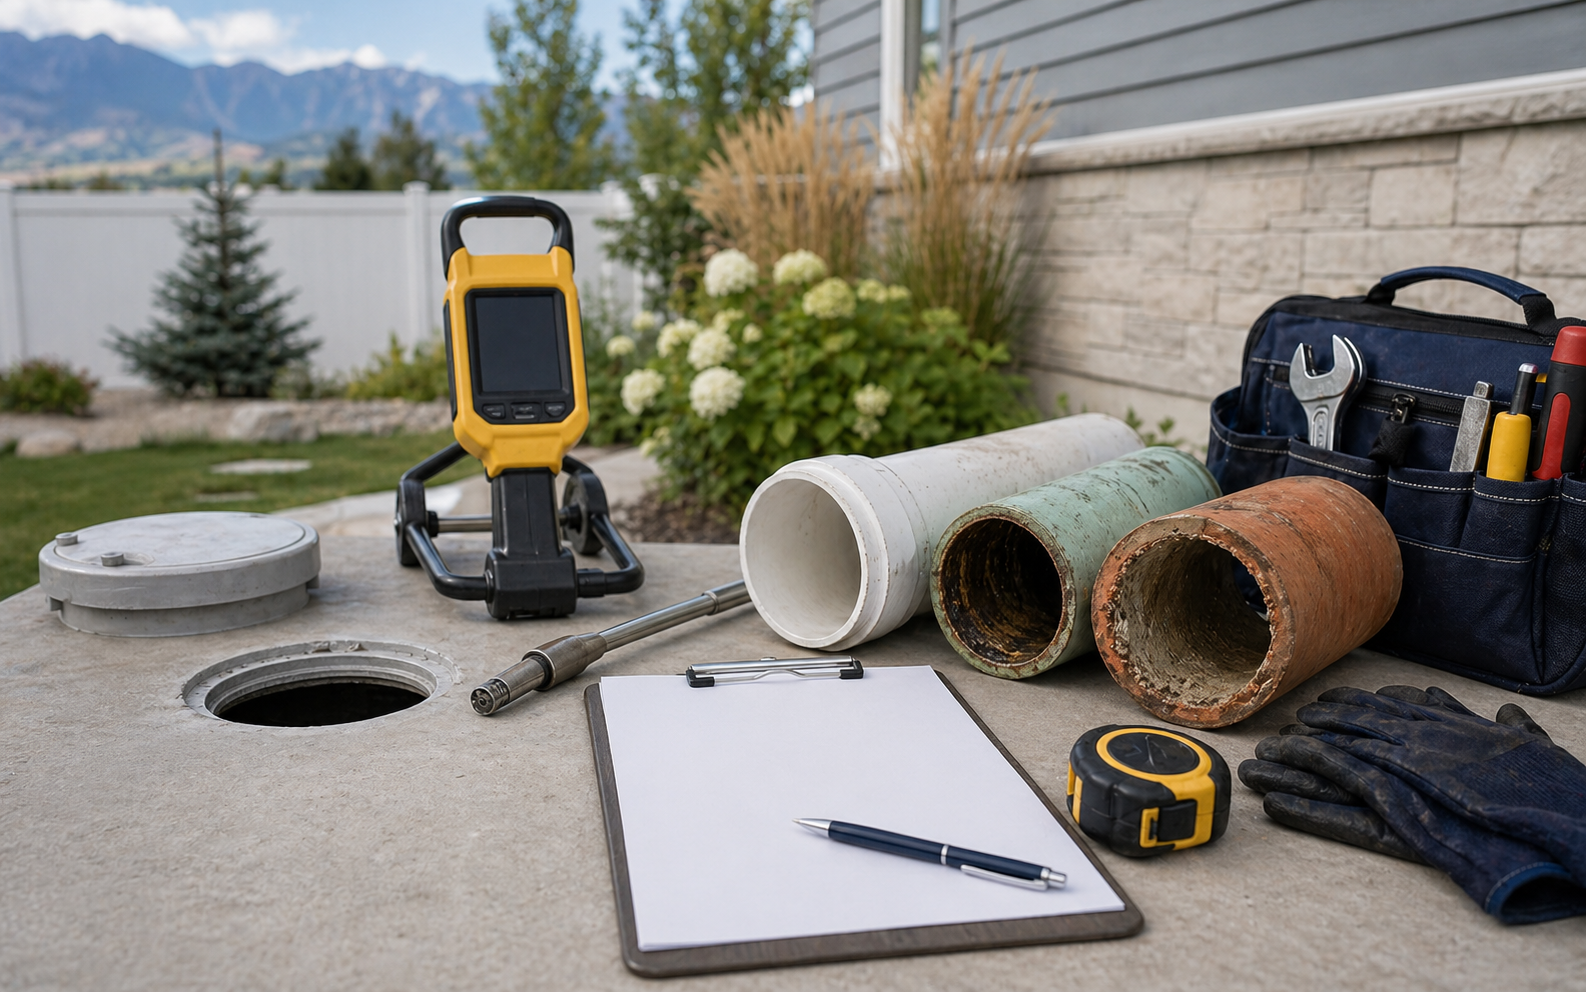
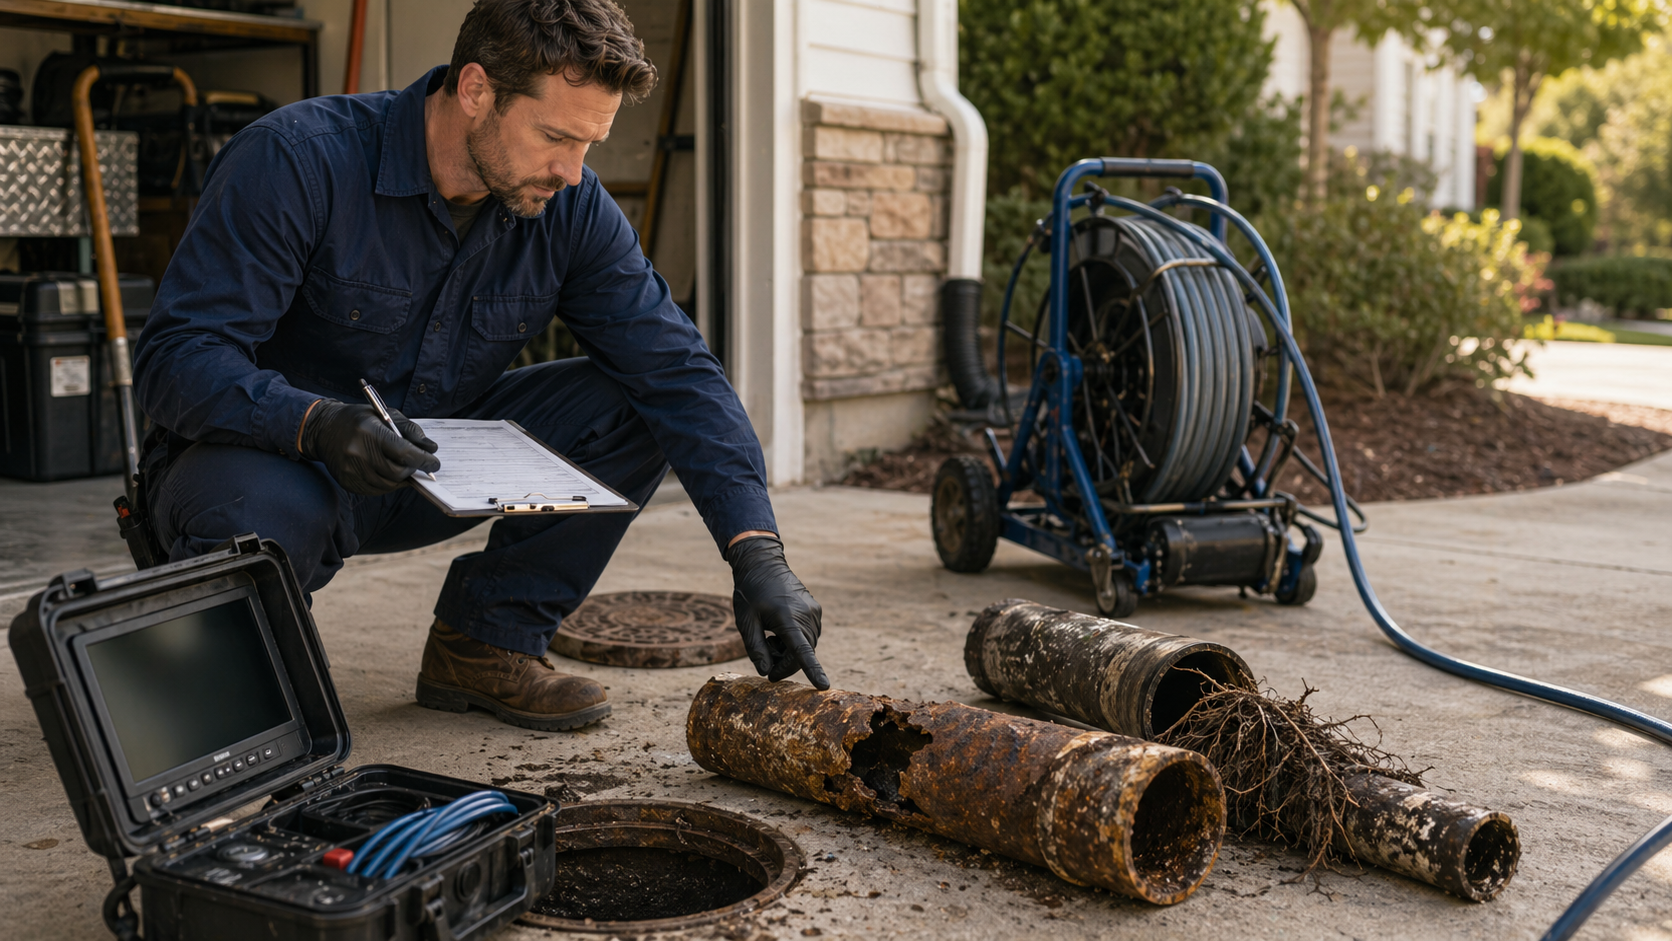
If cleaning restores flow and the camera shows a structurally sound pipe with no cracks, offsets, bellies, or root entry points, cleaning is enough. If cleaning restores flow but the camera shows structural damage — the pipe is cracked, offset, collapsed, bellied, or deteriorated — then cleaning is buying time, not fixing the problem. The blockage will return because the pipe is creating it. For the specific warning signs, see Sewer Line Repair: Warning Signs Your Pipe Needs More Than Cleaning.

Can I stay in my home during a sewer line repair?

Yes, in most cases. You will not have drain use during active repair work, but you can remain in the home. The contractor should tell you the expected downtime — typically a few hours for trenchless work and up to a full day for excavation. Plan accordingly: no showers, no laundry, no dishwasher, and limited toilet use during the work window.

Do I need a permit for sewer line repair in Northern Utah?

It depends on the scope and location. Repairs within your private property may or may not require a permit depending on your municipality. Repairs that extend into the public right-of-way — under a sidewalk, street, or city easement — typically require an excavation permit. In Weber County, an excavation permit includes a fee, with an additional charge for cutting new asphalt. The repair contractor is responsible for pulling the permit, but confirm this is included in the quote.

What warranty should I expect on sewer line repair?

For CIPP lining, the liner material is typically rated for 50+ years. Contractor workmanship warranties on CIPP installation commonly range from 5 to 10 years. For pipe bursting with HDPE, the pipe is rated for 50+ years; workmanship warranties are similar. For traditional excavation and replacement with PVC, the pipe material is long-lasting; workmanship warranties typically cover 1 to 5 years. Get the warranty in writing, confirm what it covers materials, labor, or both, and ask what voids it.

What if I disagree with the repair recommendation?

Get a second opinion that includes a camera inspection. If two contractors look at camera footage of the same pipe and recommend the same repair method, the recommendation is likely sound. If they recommend different methods or different scopes, ask each one to explain why their approach fits the defect. The camera footage is objective — it shows the same pipe condition to everyone. The disagreement is usually about method preference, not about what is wrong.

Read This Next

These articles stay close to the same decision without repeating this one. Use them when the symptoms, timing, or service path points in a slightly different direction.

Source Log

These sources were used for background, claim checking, or local context. The article explains the topic in Mountain West's own words and does not copy outside article structure or long passages.

U.S. Environmental Protection Agencyparaphrased

Sanitary Sewer Overflows (SSOs)

Supports: Sanitary sewer overflows can back up into buildings, damage property, and create public-health concerns; sewer systems carry domestic and commercial wastewater to treatment facilities.

U.S. Environmental Protection Agencyparaphrased

Sanitary Sewer Overflow Frequent Questions

Supports: Common sewer blockage contributors include fats, oils and grease, wipes and other non-flushable products, roots entering defects, sediment, and other materials.

NASSCOparaphrased

Assessment

Supports: Internal television inspection is a major tool for assessing sewer-pipe condition and turning symptoms into documented findings.

Ogden Cityparaphrased

Sewer Utility Information

Supports: Local Utah utility guidance can make the private-lateral responsibility clear: property owners may be responsible for maintenance and repair from the home to the city main, including tap connection, depending on jurisdiction.

Manual review note: Local ownership rules vary by city and utility. Treat this as regional context, not legal advice for every property.

Blue Stakes of Utahparaphrased

Blue Stakes of Utah 811

Supports: Utah law requires contractors to call 811 at least 48 hours before excavation so utility companies can mark buried infrastructure. Blue Stakes coordinates the locate process statewide.

Weber County Engineeringparaphrased

Excavation Permits

Supports: Excavation in the public right-of-way requires a permit through Weber County Engineering. An extra $150 fee is assessed for cutting new asphalt, reducing by $50 per year for three years.

Utah Division of Occupational and Professional Licensing DOPLparaphrased

S410 Specialty Contractor License

Supports: The S410 classification covers boiler, pipeline, waste water, and water conditioner contractor work under Utah Code R156-55a-301, authorizing sewer, sewer lines, sewage disposal, septic tank, and drainage work.

Related Next Steps

Next StepSewer Line Repair And ReplacementGo here if sewer line repair points toward structural sewer repair instead of another cleaning-only visit.Next StepSewer Camera InspectionUse this page if sewer line repair makes you want diagnostic footage before choosing the next path.Next StepGet A Free QuoteStart a free quote if you want service-fit or pricing guidance after this article.Next StepRead BlogCompare adjacent articles around sewer line repair before you choose the next path.

More for You

Follow-up blog articles chosen for this page so the next question stays close to the same decision path.

Sewer Line Repair: Warning Signs Your Pipe Needs More Than Cleaning article image for Sewer Line Repair And Replacement.Blog ArticleSewer Line Repair: Warning Signs Your Pipe Needs More Than CleaningRead this next for another sewer line repair and replacement angle that builds on this article.Sewer Line Repair vs. Sewer Line Replacement: How to Decide Based on What the Camera Shows article image for Sewer Line Repair And Replacement.Blog ArticleSewer Line Repair vs. Sewer Line Replacement: How to Decide Based on What the Camera ShowsRead this next for another sewer line repair and replacement angle that builds on this article.Sewer Line Repair: What the Job Involves and What Drives the Cost article image for Sewer Line Repair And Replacement.Blog ArticleSewer Line Repair: What the Job Involves and What Drives the CostRead this next for another sewer line repair and replacement angle that builds on this article.When Drain Cleaning Stops Working: Signs You Need Sewer Line Repair article image for Sewer Line Repair And Replacement.Blog ArticleWhen Drain Cleaning Stops Working: Signs You Need Sewer Line RepairRead this next for another sewer line repair and replacement angle that builds on this article.

Quick Answers About Sewer Line Repair Near Me: What to Expect From Start to Finish

These are the quick answers most people want before they call, book, or decide on the next step.

What is this article about?

Searching for sewer line repair near me usually means someone has already told you the line needs work — a technician who found damage during a cleaning visit, a home inspector during a sale, or your own experience with backups that cleaning no longer fixes. The problem is that "your line needs repair" does not tell you what happens next. This article walks you through the full process, stage by stage, so you can evaluate recommendations, compare contractors, and know what to expect at every step. It connects the topic back to sewer line repair and replacement when readers are trying to decide on the right next move.

Who is this article best for?

A sewer line repair is one of the larger expenses a homeowner faces — and one of the least understood. Most homeowners have never been through the process and do not know what is normal, what is optional, and what is a red flag. It is most useful for readers trying to understand the issue before they book, compare services, or decide whether the symptoms point to a bigger sewer or drain problem.

What should I do after reading this article?

If the issue sounds familiar, the usual next step is to review the sewer line repair and replacement page or compare it with sewer camera inspection before deciding whether to request a quote, book service, or call for faster guidance.

How can I reach Mountain West?

Mountain West Hydro Jetting serves Northern Utah and the Salt Lake corridor. You can reach us at 801-317-8104 or [email protected].